
Key Takeaways:
- The Best Overall Airbrush for Miniatures and Models is the Badger Patriot 105
- When you buy a Badger Airbrush be sure to get the Adapter for the compressor hose if needed.
- The Best Airbrush for Fine Detail on Miniatures and Models is the
- When considering cost, remember you need a compressor too, my recommendation is the Zeny or similar AS-186 model.
In my case, I was always hesitant to pull the trigger on an airbrush (ha! airbrushes have triggers), but after seeing enough people use em’, I bought my first.
I was afraid to get anything too expensive and break it, or too cheap … and break it. I wanted a good value, durable, capable, easy to use, but not hundreds of dollars.
I had grand dreams of zenithal priming, and they all came true after I took the plunge into my first airbrush. I now have 3 airbrushes that I use regularly.
As for which is the BEST, I always have the same answer:
The Best Airbrush for Miniature and Model Painting in 2021:
Amazon productThe bulk of the airbrush work I do on my miniatures is priming and base coating.
There are times I need to do finer detail work though, such as thin lines, very small highlights, and precise glazes. I’m thinking specifically of some Ultramarines I did a little while back.
If you look at this image, the Iwata HPCS is what I used to get the highlights on his head, shoulder pads, and backpack:

For work like that, the Badger 105 is capable, but it’s not the best tool I have. When it comes to finer detail I switch to the Iwata. The HP-CS has a .35 nozzle size, giving it a narrow spray. It’s very well made and has a very smooth trigger that allows for more control.
It is capable of extremely thin lines and small dots and is excellent for up-close detail work.
This is my go-to for highlighting and small details. I love the quality of this airbrush and honestly, it’s a fantastic all-around brush. If you wanted to skip right to this brush and use it for everything I wouldn’t object!
The only reason it’s not the overall best is the price point and a slightly higher learning curve.
The Badger 105 is very much pour-and-shoot, bulletproof, and easy to pick up.
The Iwata needs a bit more finesse, but by no means is it difficult to use.
Another thing about the Iwata – and this is small but I just love it – they test each individual unit and give you the little piece of paper they used to test it showing the spray pattern.
Here is mine:

So you can see there, it’s capable of wide lines and very thin precise lines.
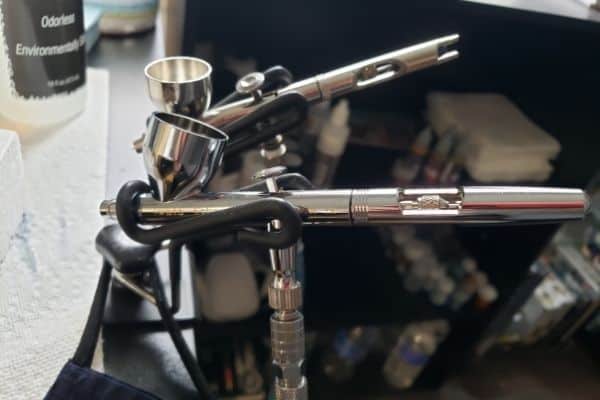
Again, I personally have both brushes and the Infinity CR+. I keep two ready to go with a splitter and quick disconnect.
Here is the Iwata and Patriot 105 hanging out together on my desk:
Accessories
What Is an Airbrush Hose Splitter?
This airbrush accessory screws into the compressor and gives access for two air hoses. Very inexpensive, worth getting if you have multiple brushes.
The benefit here is being able to have two brushes always attached to the single compressor without having to swap them.
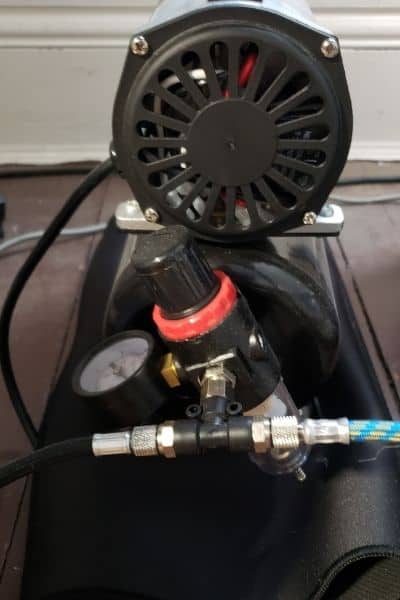
Here is a picture of my splitter attached to my Zeny Compressor, again mine is nearly identical to the Point Zero I recommend:
What Is an Airbrush Quick Disconnect?
This is a small two-part adapter that screws onto your airbrush. The other end screws on to your air hose. There is a small, airtight decoupling in between the two screw ends. Again inexpensive and you get a bunch of them in the pack.
You pull up on the decoupler, and it disconnects without having to unscrew anything. Perfect for quickly changing airbrushes!
Here is mine:

What Is an Airbrush Stand or Holder?
As you might guess, an airbrush stand (or holder) holds your airbrushes when not in use. They are something you can DIY, but I would have something to hold it.
If you are just starting, I would simply get this cleaning pot to use as a stand.
It comes with cleaning tools too, so it’s great to have regardless. If you’re branching out to multiple brushes, there’s another option.
I went with this stand because it fit my desk well.
Advanced Airbrushing
When you’re really getting to a point that the airbrush is the limiting factor and not your personal skill, you might start to look for something really special.
A very smooth trigger, for example. An extremely precise nozzle with a teeny tiny diameter for ultra-fine dots and lines. A sexy design and a gift to yourself.
If those are the things you’re looking for…
The best airbrush for the advanced painting of miniatures and models is the Infinity CR+.
Amazon productThis model has an option for a .15 or .2 nozzle size that allows it to make extremely thin lines and small dots.
It has a very smooth trigger that gives excellent control of paint flow.
There is also a quick-fix dial on this airbrush that acts as a stop to regulate how much you can pull back on the trigger.
The Infinity CR+ has a host of high-end features including chrome plating, high-quality seals, quick release cap, adjustable trigger torsion, multiple size paint cups, and more.
It’s quite fancy 🙂 It also looks great.
Comparing Airbrush Models
| Model | Pros | Cons |
| The Badger – Patriot 105 | Fantastic for beginners. The 105 is reliable and inexpensive. Larger needle size is perfect for easy priming and base coating. | No high-end features. Trigger is not as smooth as other airbrushes. |
| The Iwata – Eclipse HP-CS | High-quality and versatile airbrush. Can do it all very well. Excellent value. | More expensive than entry-level airbrushes. Some features not necessary if you are only using it for priming. |
| Infinity CR+ | Very high-quality airbrush. Extremely smooth trigger. Option for .15 or .2 diameter needle for extreme detail work. | Might be overkill if you’re not able to utilize this airbrush to its fullest. |
Comparing Compressor Models
| Model | Pros | Cons |
| Badger TC910 Compressor | This is an excellent midrange option. Smooth and reliable airflow at low decibels. Large tank for steady pressure, and it comes with a case and airbrush holders. | For a beginner on a budget, spend the extra money on the airbrush and accessories. That would give more value. |
| Zeny Compressor AS-186 Model | My personal compressor. This is one of many branded versions of the AS-186 Model, and they are all similar. Great quality and value, does everything you need it to do. Get the one with the tank for steady air pressure. | There are smoother, quieter, more high-end options available for you, at higher prices of course. |
| Iwata-Medea Studio Series Smart Jet Pro Single Piston Air Compressor | The no-compromises, high-end, quiet, smooth, steady-airflow option. Iwata is a great company and knows what it’s doing. | Yes, you get high-end features like twin air regulators, but will you take advantage of it? This is for advanced airbrush users. |
Airbrush Features
Airbrushes come in a variety of configurations.
All of the three recommended airbrushes for miniature and model painting share the same feature set: dual-action, gravity-feed, internal-mix airbrushes.
The needle and nozzle sizes vary. I’ll go into detail on all of these below.
Single-Action vs. Dual-Action Airbrush
The simple explanation here is:
Single action means when you press the trigger, you get both air and paint flow.
Dual-action is when you press down on the trigger, you get air flow, when you pull back on the trigger, you get paint.
For miniature painting, you want a dual-action airbrush. This gives much more control over how much paint is used.
You’ll also have times when you want to just shoot air through to either air dry a model or get rid of any excess paint stuck in the nozzle before you spray your model.
Gravity-Feed vs. Siphon-Feed Airbrush
Gravity-feed airbrushes have a paint cup on top; the paint flows down with gravity into the airbrush. From there it mixes with the air and sprays out the nozzle.
Siphon-feed airbrushes have a hose attached to a container that sucks up paint into the airbrush. This is higher capacity but gives less control over the paint flow.
For miniature and model painting you want a gravity-feed airbrush.
Internal and External Mix
Internal and external mix refers to where the paint interacts with the air flow, either outside the mechanism or within the housing.
For Miniature and Model painting look for an internal-mix airbrush, like the ones recommended above.
The internal mix gives a fine pattern and more control for accuracy. All of the choices here are internal-mix airbrushes.
Needle and Nozzle Sizes
For needle and nozzle sizes, just understand you’re talking about the size of the hole through which the paint and air shoot.
Smaller hole means a smaller spray cone. It also means the paint has to be thinner to shoot through without clogging.
The needle is what is controlled by the trigger. Pulling back on the trigger pulls the needle back and opens the nozzle hole to release paint when you spray.
For size reference, I’ll use the airbrushes I own and recommend.
Badger Patriot 105: A 0.5-millimeter nozzle size.
This sounds very small but in terms of airbrushes used in miniature and model painting, it’s among the largest commonly used.
This means that it has a wider pattern and great coverage, and the paint flows through easier. For priming, base coating, and terrain, bigger is better.
Iwata HPCS: A .35-nozzle size and a great representation of the middle ground. This gives the brush a lot of versatility.
You can get very fine and still shoot broad paint streams for priming and terrain.
Infinity CR+ 2 in 1: This 2-in-1 version of the Infinity CR+ airbrush comes with options. I bought the version with both a .4 and .2 needle included.
There is also an option for a .15 needle. They give you different size needles to tackle different tasks.
A .2 or .15 is VERY small and you can get teeny tiny dots and lines from this size needle. Again, the trade-off being a requirement of very thin paint with no clumps at all.
Compressor Features
Compressors are fairly straightforward but still are an important consideration.
The ideal compressor for airbrushing miniatures and models has these features: tank, adjustable pressure gauge, and an auto on/off feature.
None of the features are absolutely essential, but they’re all very highly recommended and come on most compressors.
Every compressor I recommended has these features.
Tank vs. Tankless
A tank on the compressor does a couple of things. It keeps the pressure steady, which is important for applying clean and smooth coats.
It keeps the compressor from turning on and off all the time, which can be very annoying if it’s happening a lot.
I always recommend a tank on the compressor. All the recommended compressors have this feature.
Auto On/Off Feature
I guess it’s obvious, but make sure it has this feature. It’s just a great quality-of-life feature, and it’s not going to cost much.
It will shut off when pressure is reached and go back on once it’s needed again.
Great to pair with a tank. Again this is on every recommended compressor in the article.
Adjustable Pressure Gauge
Of all the options, this is the most important. Although not 100% needed, it’s as close as possible to necessary.
You’ll want to be able to play around with the air pressure when you’re doing different tasks. Lower pressure for up close is what I’ve found helps most, and I use higher pressure when far away.
Exactly what pressure? Play around with it. What I typically do, and a good starting point: 10 psi for up-close, fine work. 20-25 psi for priming and base coating.
Airbrush Accessories
Spray Booth
I was going to say this isn’t absolutely necessary, but it kind of is. You need something to spray into unless you don’t mind paint everywhere.
You can absolutely DIY this with a cardboard box or something similar.
I’ve even seen people hook up fans and exhaust to a cardboard box and dryer duct to vent it outside.
My take is this: You absolutely want something to catch overspray paint, ideally some kind of vent to the outside.
If you have no ventilation at all DEFINITELY wear a respirator mask – something full face with a filter.
The acrylic paint is non-toxic, but it’s also being aerosolized, and you don’t want to breathe paint.
I personally got this model.
It’s worth it to me to have it vented out. I still wear a mask, but I switched to the cloth-style face covering.
Masks and PPE
My go-to mask for a long time was this 3M respirator.
With the ventilated spray booth, I often use just a cloth-style mask now.
Again do not breathe paint fumes. Even nontoxic acrylic is not great for your lungs. Especially if you’re painting a lot, be safe about it.
I find the 3M mask to be very comfortable and didn’t mind wearing it at all.
Thinners and Paints
I go into the best paints and thinners here, but for now, let’s keep things very direct.
You can use virtually any paint through an airbrush. The determining factors are how thin the paint is, and how well it flows through the airbrush.
Some paints don’t thin down very well, meaning they are too runny, give poor coverage, have lots of clumps, or generally don’t perform as intended.
Acrylics
To thin paints for airbrush use here’s a quick list for acrylic paints like Vallejo, Citadel, Reaper, Scale 75, Pro Acryl, etc:
Water: You can use water, either straight tap water or any fancy water like distilled or deionized water. I personally would just use tap water, but I tend to stick with airbrush thinner or flow improver.
Airbrush Thinner: Nothing really special to make it “airbrush” thinner as opposed to normal acrylic thinner medium that I’m aware of. I just got a big bottle of Vallejo Thinner. Works great.
Airbrush Flow Improver: The main job of flow improver is to slow down the drying time of acrylic paint. Acrylics dry very fast, and when that happens they can clog the airbrush.
When I am about to start airbrushing I will always shoot a little bit of flow improver (Vallejo is awesome) through the airbrush before adding paint to keep things moving. When thinning my paint, I typically do a few drops of flow improver and a few of thinner. No science to it – just develop a feel for it.
Tamiya Paints
Tamiya paints are not water-based acrylics, and they need their own solvent to thin down. Tamiya products work really, really well in an airbrush, especially the Flat White.
It’s hard to find good white paint in general, especially one that works well in an airbrush.
I find them to be extremely smooth and easy to work with if thinned down enough. I highly recommend trying Tamiya Flat White Paint and Tamiya Thinner when you’re ready.
Again, you don’t want to breathe the fumes, so ventilate your work area, and mask up.
Pro Tip: use these little pipettes to get the paint and thinner out and mix your paints in these little metal tins with a spout.
Cleaning Tools
For cleaning and maintaining your airbrush there are a couple of obvious products that help and a few that I’ve found to be extremely helpful but not as obvious.
The obvious stuff is a cleaning pot and tools (these often come together like with the set I use) and airbrush cleaning fluid.
I have them all, and I do recommend them all. Nothing fancy needed.
Here are the not-so-obvious things I use to clean my airbrush: baby wipes, paper towels, a bucket with a lid, and a squeezy water bottle.
How I clean my airbrush when I’m done painting for the day:
- When you’re done painting, use the squeeze bottle to rinse the cup and pour it into the bucket.
- Repeat til mostly clean, three or four times usually.
- Backflow the airbrush: plug up the nozzle with a cloth or pinch your fingers over it so no air can come out (don’t get poked by the needle), then let air flow. It will bubble up in the cup. This gets a lot of the inside paint out of the brush.
- Use a baby wipe and/or paper towels to get the residual paint out.
- Finish by shooting airbrush cleaner through the airbrush into your cleaning pot.
Squeaky clean and ready for next time!